venerdì 30 novembre 2012

Volumetric lighting in Blender

Hi, this psot is about how to create a volumetric light in blender.
Here is an example of volumetric light:


There is only a lamp type that support volumetric lighting in blender: the spot.
First of all add the spot(Optional: in the lamp properties check Show cone to see how light influence your scene). Then go in lamp properties and in Spot Shape submenu check Halo and edit Step to 12.
Now you have created a volumetric light but if you wanna get a better result (not always, but sometimes  using this it looks more realistic) activate Ambient Occlusion and Indirect Lighting int the World Properties.
I hope you found this post useful, if you have any question comment or send me an e-mail to damianoandre@gmail.com

Bye, Dami

lunedì 12 novembre 2012

Use Arduino to program AVR

Hi, today I'm posting about programming an AVR (such as an attiny85) using Arduino.
You'll need:
- one LED
-10 microfarad capacitor
-an AVR (in my case an attiny85)
-an Arduino board (in my case Arduino UNO)
-some wires

First of all open the Arduino IDE and upload the ArduinoISP sketch (you can find it in File>Examples)
If you are using arduino 1.0 software check that in the void heartbeat() there is a line that says delay(20) if not change it.
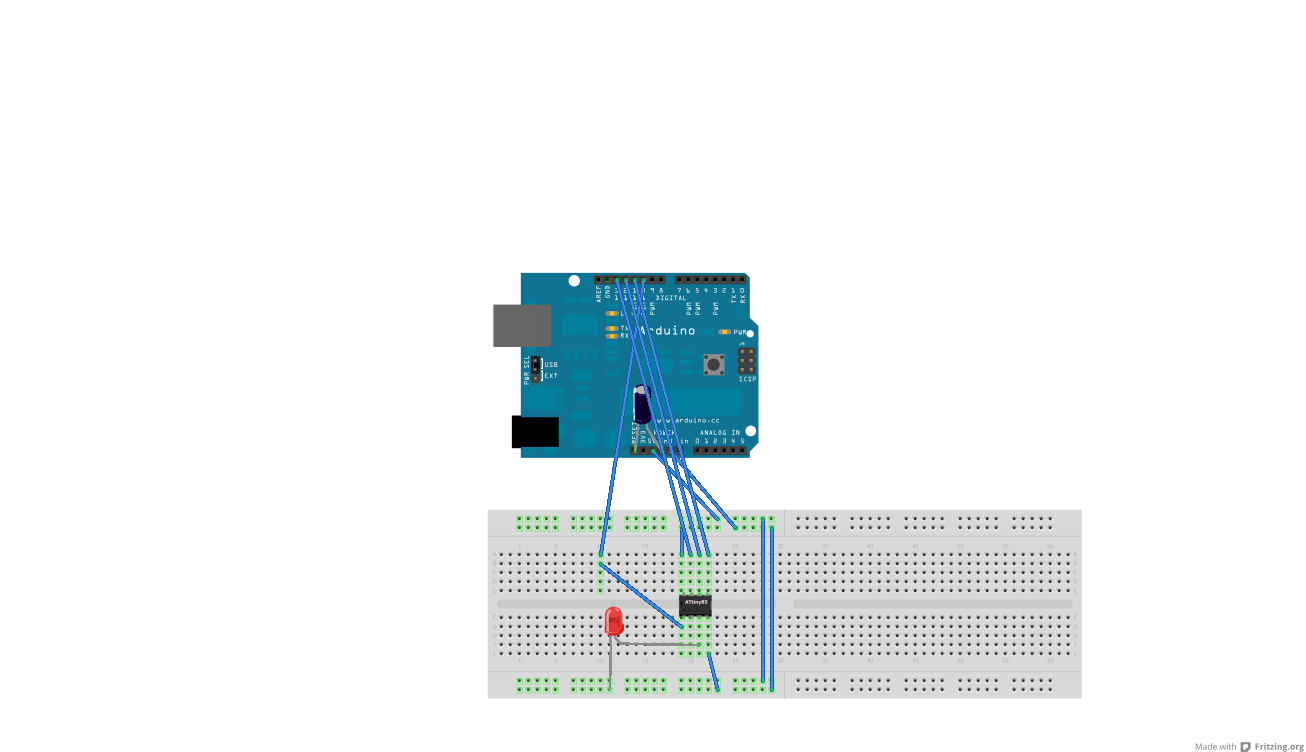
When you have uploaded it to Arduino disconnect the board from pc and connect your avr like this:
-Arudino GND to AVR GND
-Arduino 5v to AVR VCC
-Arduino pin 10 to RST pin on AVR
-Arduino pin 11 to MOSI pin on AVR
-Arduino pin 12 to MISO pin on AVR
-Arduino pin 13 to SCK pin on AVR
-10 microfarad capacitor  between GND and Reset on Arduino

If you are using an Attiny85/45/13 it should look like this:


Now hardware side everything it's done.
To compile and upload the code for the AVR we need a software like WinAVR.
Download and install it, then create a C source file with your code in my case this:
 
#include <avr/io.h>
#define F_CPU 1000000UL
#include <util/delay.h>

int main(void) {
    int n;
    DDRB |= ( 1 << 4 );
    while (1) {
        PORTB &= ~(1 << 4 );
        _delay_ms(1000);
        PORTB |= ( 1 << 4 );
        _delay_ms(1000);
    }
    return 0;
}

Now you're ready to compile and upload your code:
-connect arduino to USB
-navigate to code folder using cd command
-compile your code using these commands:
for attiny13:
avr-gcc -g -Os -c -mmcu=attiny13 test.c
avr-gcc -mmcu=attiny13 test.o -o test.elf
avr-objcopy -O ihex -R .eeprom test.elf test.hex
 
for attiny85/45:
avr-gcc -g -Os -c -mmcu=attiny85 test.c
avr-gcc -mmcu=attiny85 test.o -o test.elf
avr-objcopy -O ihex -R .eeprom test.elf test.hex 

check this for more commands.

-upload your code with this command:

avrdude -P COM4 -p t13 -c avrisp -b 19200 -U test.hex
 
If you're using a different port change COM4.
 
Now everything it's done and the AVR should be programmed.


Here are some photos of the project:


I hope you like this post, if you have any question comment or send me an e-mail to
damianoandre@gmail.com 

Bye, Dami

lunedì 29 ottobre 2012

Horror corridor made using blender

Hi today I'm posting about creating an horror corridor using blender, I think that it's simple to make it but the result it's cool, here is the final render:


And here is the download of the blender project(.blend).

I hope you like this post, if you have any question please comment or send me an e-mail to damianoandre@gmail.com

Bye, Dami

martedì 9 ottobre 2012

Minecraft zeppelin mod use tutorial

Hi, today i'm posting about the zeppelin minecraft mod.
This mod makes you able to make your bluiding fly.
To use this mod download and install it(premoodded minecraft folder download).
When it's installed try creating a 3x3 square of wooden planks and place in the center an airship controller


then right-click on the airship controller and start flying, to fly use there commands(in the numeric keypad):
8 to go ahead
2 to go back
4 to rotate to left
6 to rotate to right
5 to stop
+ to ascend
- to descend

This works with everything based on wooden planks and iron blocks and if you stay near the airship controller, but if you want to control you airship remotely you need a zeppelin remote, to use that just right click on the airship controller and use the same commands.
Here is a video demostration about the mod:


I hope you like this post, if you have any question comment or send me an e-mail to damianoandre@gmail.com

Bye, Dami


sabato 29 settembre 2012

Best free screen recording softwares

If you wanna record your screen there are lots of software but it's difficult to say wich one is the best, I think that the best three are:
-The MajorSilence screen recorder : it is good to record desktop, it create very small output files but it isn't very good with 3d software like games.
-The ezvid built-in screen recorder : it records in high quality but creates big output files and it doesn't record fullscreen mode games
-The ffmpeg based screen recorder : it record about everything and in a good quality but it creates big output files

I don't know which one is the best but I personally prefer the ffmpeg based.
I hope this post will be useful, if you have any question comment or send me an e-mail to damianoandre@gmail.com

Bye, Dami
mercoledì 5 settembre 2012

Too much accounts D:

This post isn't a guide or a tutorial it's just about all the account's that we have to manage everyday:
-Google(Gmail, Blogger, and all the other google services)
-Facebook
-Twitter
-Minus
-Scribd
-Openprocessing
-All the other forums accounts(arduino forum, processing forum)
-Online games acccounts
-Other

If we continue creating online services we'll need another online service that remember us to check each account!
This post is quite useless but I think to this everyday!

Bye, Dami

Scribd: online documents sharing

Today I'm posting about an online text documents sharing service: scribd.
I used that service sometimes (here is my account) I think it's cool, it makes people able to read documents online or to download them.ù
You can easily login using your facebook account and start uploading files or reading online documents.
Probably I'll upload the battlefield 3 guide this weekend or next week.
I know it's a short post but I think scribd it's really user friendly.

Bye, Dami

martedì 28 agosto 2012

Creating a Qt application in c++ in Windows

Today i'm posting about the famous GUI library created by nokia: Qt.
This  library provide a cross-platform application and UI framework.
To start programming with this library in windows we need to install first minGW (gcc ported to windows), you can download it here.
At the end of the installation add the minGW/bin folder to your PATH variable, to do this go to
control panel>system>advanced system settings>advanced>environment variables

then select the PATH variable in  the system variables and click edit and add at the end

;C:\MinGW\bin

now to check if everything it's working open the command line and try writing

make

If it's recognized as a command you've done everything right else try checking this tutorial for the installation.
Now we need to install the Qt library that you can download here.
When you finished downloading, install the library and add the    C:\Qt\4.8.2\bin
to the environment variables just like we have done with the minGW binaries.
When you've done check if everything is working writing in the command line

qmake

To start programming create file main.cpp and write this code:

#include <Qt/QApplication.h>
#include <Qt/QWidget.h>

int main(int argc, char *argv[]){
    QApplication app(argc, argv);

    QWidget window;

    window.resize(250, 150);
    window.setWindowTitle("Example");
    window.show();

    return app.exec();
}

Now open a command line and move to the folder that contains the file using cd command and then write this in the command line to compile the file:

qmake -project
qmake
make

If there's no error in your code or in the environment variables you will find the compiled file in the debug folder.

I hope you like this post, if you have any question please comment or send me an e-mail to damianoandre@gmail.com

Bye, Dami